
I’ve got a special Freebie Friday for ya! This time it’s accompanied by a tutorial!
I’m going to let you in on a little secret of mine. Sometimes I really do doodle with my Wacom in Illustrator… but sometimes… I… fake it. YES! My life is an LIE! *sigh* Okay, not really a lie. This is just an easy way to make doodley circles in Photoshop because the result looks great, I don’t have to walk across the room to get out my Wacom, and I can just do it faster in PS. There are times when doodling for REAL is better, but sometimes I’m just too dang lazy to get my tablet out. I used to use my Wacom the entire time I was on the computer, but I have a 1-year-old who is an excellent climber and he LOVES to climb up on my desktop and stab my Wacom with the Wacom pen. Yikes. It’s not safe for my poor tablet to just sit on my desk all the time. sad story.
My Wacom is feeling betrayed. And lonely. shhhhhh… don’t tell him I like fake doodles! K? You’ll just shatter him. He’s fragile. And emotional.
So, we’re going to make some wonky doodley circles today. We’re using the Warp Tool, Brushes, and Paths. Sorry, Elements users… this is a tutorial for the PSCS crowd. BUT if you have Photoshop Elements, there is still some good for you at the end of this post – a FREEBIE!
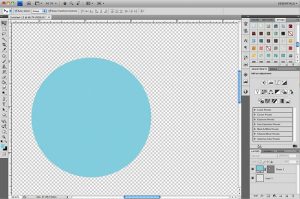
1. Create a circle with the shape tool. Easy peasy. Leave it as a vector. Don’t rasterize the circle. We want that vector mask for the warping part so the edges stay nice and clean!
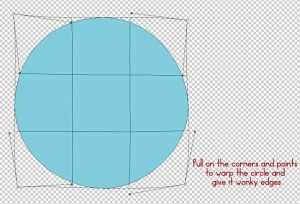
2. Put it in warp mode. Hit CTRL+T (COMMAND+T on Mac) and then select the Warp Tool along the upper bar. The bounding box will now be split into nine sections.
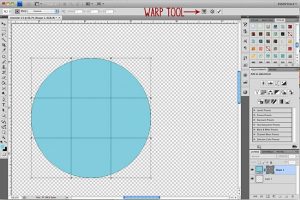
3. Warp it! Pull at the corners and points to make the edges irregular and wonky. I like the word wonky. It’s fun to say. We don’t want perfect circles here! We need a hand-cut look and it will help the doodles look more like real doodles. When you’re done playing with the circle, hit ENTER to commit.
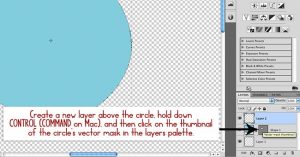
4. Create a new layer for the doodle. Create a new layer above the circle. Then hold down CTRL (Command) and click on the thumbnail of the circle’s vector mask in the layers palette. Then you’ll get the marching ants. We want this selection on a different layer because then we can clip papers to the circle below and make FUN elements.
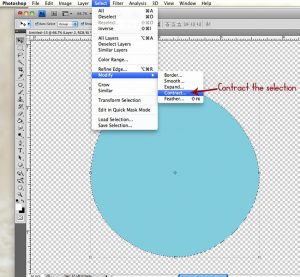
5. Contract the selection. SELECT > MODIFY > CONTRACT. Then put in a value based upon how much you’d like to contract the selection. I put in 22 pixels this time.
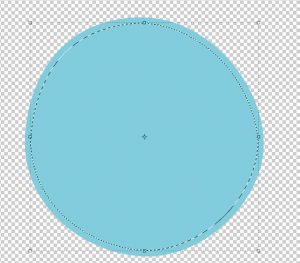
Your “marching ants” will contract like this…
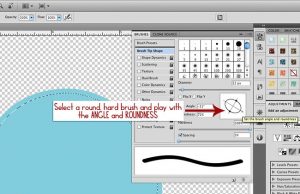
6. Make yourself a doodley brush. Open up the brushes palette and select a hard, round brush. I’ve found that a brush size of 9-12 pixels is usually perfect, but play with the size based upon how thick you want the doodle. Set the spacing to 1% and then play with the roundness and angle of the brush. This time I set it to an angle of -31 degrees and a roundness of 72%. Make sure the hardness is set to 100% so you get a clean doodle.
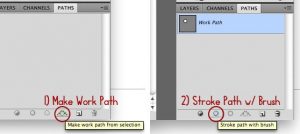
7. Make a path and stroke the path with the brush. Switch over to your PATHS palette. Make a work path and then stroke that path with the brush. You should see your doodle there now! Once you’ve done that, you can delete the work path.
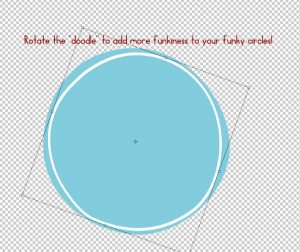
8. Play with the doodle to add more funkiness. I like to rotate the doodle layer so that the doodle doesn’t line up exactly with the edges of the circle below it. It gives it more of a handmade look!
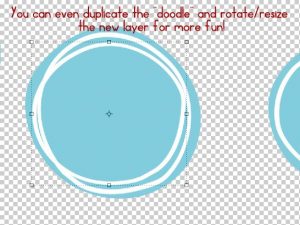
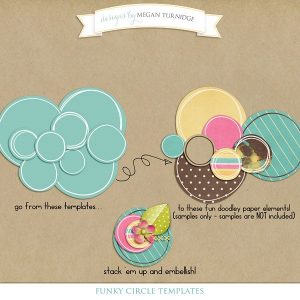
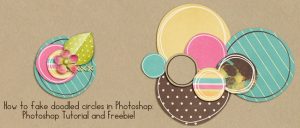
Now you have a template that you can add your papers too! Simply put your paper above the circle shape (but below the doodle layer) and clip the paper to the circle. Have fun stacking up multiple circles and adding embellishments!
Don’t feel like doing the work yourself? I made you a freebie! This pack contains 9 different funky circle templates – provided in PSD, TIF, and PNG formats. Happy Freebie Friday!